Introduction
802.1X is a network access control (NAC) standard that provides an authentication framework for controlling access to network resources. It is a part of the IEEE 802.1 group of protocols, which defines how devices in a Local Area Network (LAN) communicate with each other.
The main purpose of 802.1X is to ensure that only authorized devices or users are allowed to connect to a network, thereby enhancing network security. It operates at the link layer of the OSI model and is primarily used for wired and wireless Ethernet networks.
Here’s how 802.1X works:
Supplicant:
The device (such as a computer or wireless device) that wants to connect to the network is called the supplicant. It requests access to the network and is responsible for providing authentication credentials.
Authenticator:
The network access device (such as a switch or wireless access point) that controls the physical connection to the network is called the authenticator. It acts as a gatekeeper and forwards the authentication request from the supplicant to the authentication server.
Authentication Server:
This server performs the actual authentication of the supplicant’s credentials. It could be a Remote Authentication Dial-In User Service (RADIUS) server or a similar backend system. The authentication server checks the supplicant’s credentials and returns a response to the authenticator.
EAP (Extensible Authentication Protocol):
802.1X uses EAP to encapsulate various authentication methods and provide flexibility in the authentication process. EAP allows different authentication methods to be used, such as EAP-TLS (Transport Layer Security), EAP-PEAP (Protected Extensible Authentication Protocol), EAP-TTLS (Tunneled Transport Layer Security), and more.
The authentication process typically involves a series of exchanges between the supplicant, the authenticator, and the authentication server. If the credentials provided by the supplicant are valid, the authenticator grants access to the network. If not, access is denied, and the supplicant remains isolated from the network.
Implementing 802.1x on Windows Environment
Implementing 802.1X on Windows involves configuring the following:
- Router or switch with 802.1x cability.
- Access Point with WPA2-Enterprise cability.
- ADDS (Active Directory Domain Serices.)
- ADCS (Active Directory Certiticate Services).
Configuring the Access Point with WPA2-Enterprise cability.
- Login to access point with WPA2-Enterprise cability.
- Go to Wireless setting, and configure the radius server and its shared secret.
- On this example I used
10.10.103.3IP as the Radius server,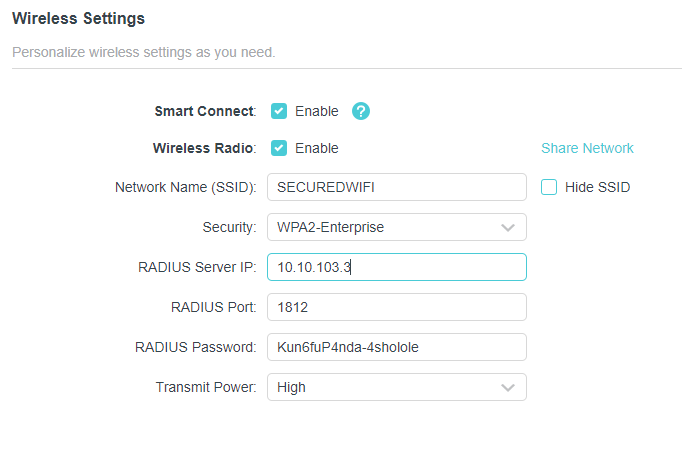
- Click Ok and Finish.
Creating a new Certificate template for the Radius server.
- Login to the Windows CA (ADCS) server.
- Open the
CA management console. - Go to
Certificate Templatesright click and selectManage. - Find
RAS and IAS servercertificate template,right clickand selectDuplicate Template. - On the duplicated template, go to
Generaland change the name, i.e:RadiusNPS. - Change the
Validity Periodto2 yearsor more, and adjust any other setting if necessary. - Go to
Security, and addRadius serverwith permissionRead, Enroll, and AutoEnrollas well as adding theRAS and IAS Serverssecurity group withEnrollonly permission. - Once done, press finish and OK button.
- You will see the
RadiusNPStemplate now. - Close the
Managementconsole and go back toCertifiate template, right clickNew -> Certificate template to Issue, and select theRadiusNPStemplate. - As we also need to import the
root CA Certificateto all the client later, we need to export the root CA certificate first.- Access the Root CA server via browser:
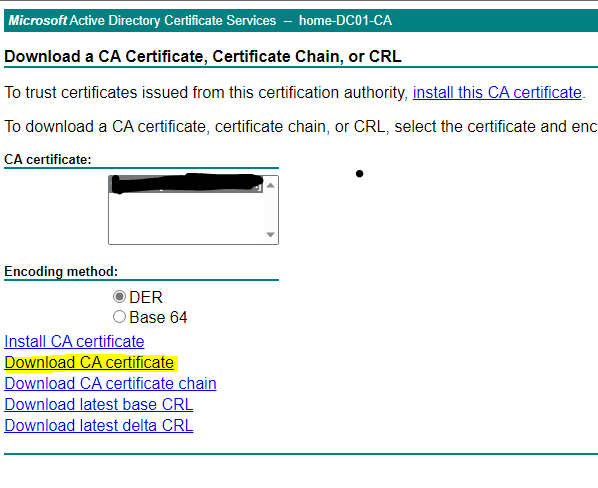
http://<ca_ip_address>/certsrv - Select Download a CA certificate, certificate chain, or CRL.
- Select Download CA certificate.
- Save the file “certnew.cer” in local disk, and rename it as
RootCA.cer. (we will import this certificate to the GPO policy later).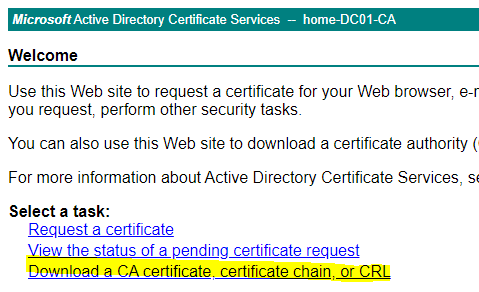
- Access the Root CA server via browser:
Installing and configuring the windows radius server.
Installing NPS role.
Login to NPS/Radius server. If you haven’t installed the NPS / Radius roles yet, go ahead install it and reboot the server if necessary.
Install-WindowsFeature NPAS -IncludeManagementTools -Verbose
Enrolling the NPS certificate
- Open
Runand typeMMC, openFile -> Add/Remove Snap-in -> Certificates -> Add -> Computer Account -> Next -> Finish. - Go to
Personal -> Certificates, right click and chooseAll Tasks -> Request New Certificates -> Next -> Next -> RadiusNPS -> Enroll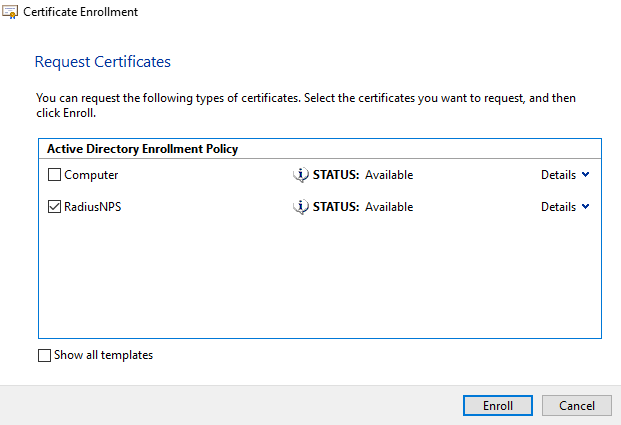
- You will see a new enrolled certificate from the
RadiusNPStemplate, with format:server.domain.com.
Configuring Secure Wireless Connections on NPS.
- Open the
NPS Dashboard. - On the
Standard Configuration, switch toRadius Server for 802.1X for Wireless and Wired Connection. - Select
Configure 802.1X, and chooseSecure Wireless Connections. - Add the
Radius Client, and the typeShared secret.
The
Shared Secretmust be matched between radius server and radius client.
- On authentication method, choose:
Microsoft: Protected EAP (PEAP). - Click the
Configure, and choose thecertificate issued toto the enrolled certificate.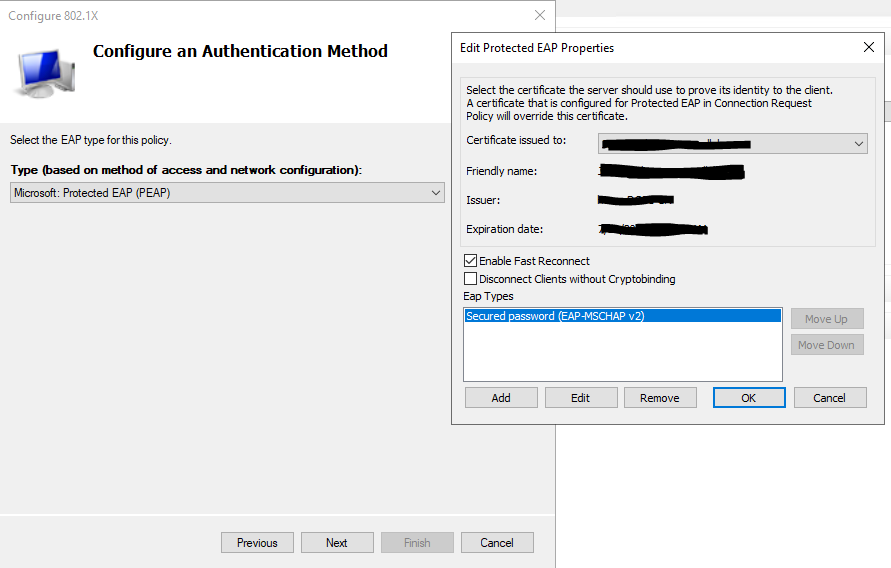
- Specify the group you want to allow or denied access.
- Double check the
Policyon theNetwork PoliciesandConnection Requrest Policiesespecially forNAS Port Typemust beWireless - IEEE 802.11
Configuring Secure Wired Connections on NPS.
- Open the
NPS Dashboard. - On the
Standard Configuration, switch toRadius Server for 802.1X for Wireless and Wired Connection. - Select
Configure 802.1X, chooseWired (Ethernet) Connections. - Add the
Radius Client, and the typeShared secret.
The
Shared Secretmust be matched between client and server.
- On authentication method, choose:
Microsoft: Protected EAP (PEAP). - Click the
Configure, and choose thecertificate issued toto the enrolled certificate. - Specify the group you want to allow or denied access.
- Double check the
Policyon theNetwork PoliciesandConnection Requrest Policiesespecially forNAS Port Typemust beWireless - IEEE 802.11
Deploying Wired and Wireless Profile AD Group Policy to Clients.
-
Login to AD server, and open the
GPO Management -
Go to
Group Policy Objectand create the following GPOs. -
Create a new GPO named: COM-Cert-AutoEnroll -> This GPO wil be used to deploy the root CA certificate, and deploy the Auto enrollment certificate setting.
- Go to
Computer Configuration -> Policies -> Windows Settings -> Security Settings -> Public Key Policies, and modifyCertificate Services Client - Auto-Enrollment Settingsas the following: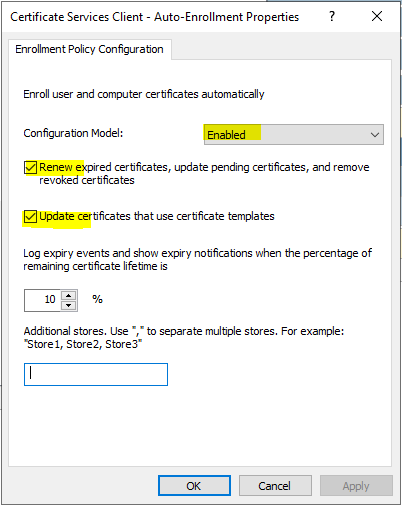
- Apply and OK.
- Go to
Computer Configuration-> Policies -> Windows Settings -> Security Settings -> Public Key Policies -> Trusted Root Certification Authoritiesand import theRootCAcertificate that we have exported before.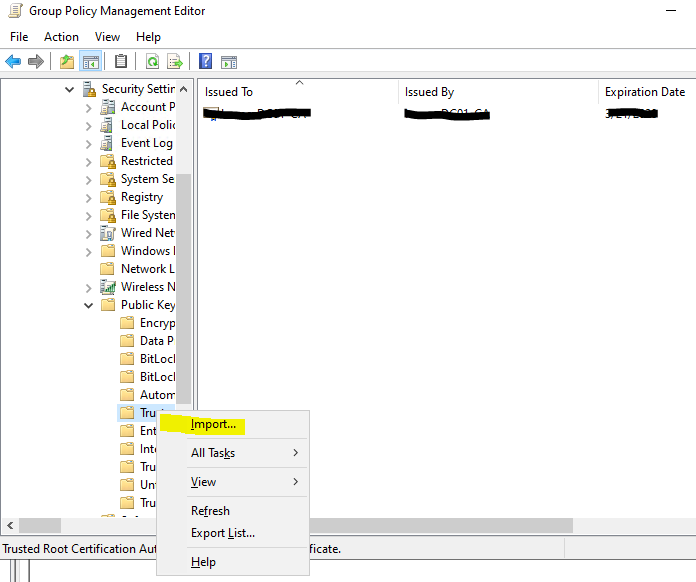
- Apply and OK.
- Close the GPO editor to save the policy.
- Go to
-
Create a new GPO named: COM-Wired-Policy -> This GPO will be used to deploy the Wired Profile Policy.
- Go to
Computer Configuration -> Policies -> Windows Settings -> Security Setting -> Wired Network (IEEE 802.3 Policies) -> Wired Network Policy - Modify the policy Name enable
Use Windows Wired Auto Config Service for client - Go to
Securitycheck theEnable User of IEExxsetting, change authentication modecomputer only. - Click
Properties, tickVerify the server's identity by validating the certificateandconnect to these servers, fill theradius serverwith FQDN format. i.e:radius.domain.com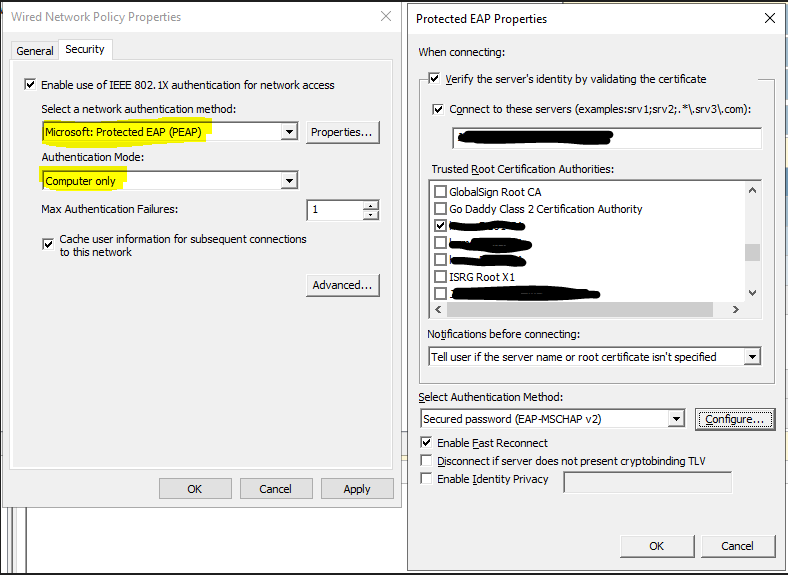
- The
802.1x wired policyrequires a services called:Wired Autoconfigto be running on the client. Set this service toAutomaticthrough this policy. - Go to
Computer Configuraton -> Policies -> Windows Setting -> Security Settings -> System Services -> Wired Autoconfig - Change the
Startup mode to Automatic - Once done, click ok, and exit the editor to save the policy.
- Go to
-
Create a new GPO named: COM-Wireless-Policy -> This GPO will be used to deploy the Wifi computer-based authentication profile to client.
- Go to
Computer Configuraton -> Policies -> Windows Setting -> Security Settings -> Wireless Network (IEE 802.11) - Right click, and
Create a New Wireless Network Policy for Windows Vista and Later Releases - On the SSD setting, add
new SSID -> Infrastructureand give the match SSID name you have created on the Wireless devices/access point. - Go to
SecurityTab. Configure the Authentication and simmiliar with the Wired policy, configure it as the following - Authentication:
WPA2-Enterprise, Encryption:AES-CCMP, Network Authentication Method:Protected EAP (PEAP), Authentication Mode:Computer Authentication. - On the
Network Authentication Method, clickProperties. Add theRADIUS serverwith FQDN format, and add the Trusted Root certificate from the CA server. - OK, and finish. Close the editor to save the policy.
- Go to
Conclusion
802.1X is particularly valuable in environments where network security is critical, such as corporate networks, educational institutions, and government organizations. It ensures that only trusted devices or users can gain access to sensitive resources and data, preventing unauthorized access and potential security breaches.